AI(Artificial Intelligence)

  • 인간의 지능을 인공적으로 구현한 것


머신러닝


학습 종류

지도학습

  • 정답이 있는 데이터를 활용해 학습
비지도학습
  • 정답 라벨이 없는 데이테로 학습


  • 비슷한 특징 → 군집화 → 결과 예측
강화학습
  • 데이터 규정 X
  • 정답 X
  • 한 행동에 보상을 받으며 학습 → 보상 최대화


지도학습의 종류

회귀(regression)

  • 값을 예측하는 방식
  • 대표적으로, 선형 회귀(Linear Regression)가 있음.

분류(Classification)

  • True, False 판별
  • 로지스틱 회귀(Logistic Regression)가 대표적.


선형 회귀(Linear Regression)


단순 선형 회귀

y=wx+b(w=weight,b=biased)y = wx + b(w = weight, b = biased)

다중 선형 회귀

y=w1∗x1+w2∗x2+b(w1,w2=weight,b=biased)y = w1 * x1 + w2 * x2 + b(w1, w2 = weight, b = biased)


오차 계산법

  • 평균 제곱 오차(MSE, Mean Squared Error)
    • 차이를 제곱하여 평균 낸 값
    • MSE=1nΣ(y^−y)2(y^=PredictedValue)MSE = {1 \over n}\Sigma(\hat{y} - y)^2 (\hat{y} = Predicted Value)
  • 평균 절대값 오차(MAE, Mean Absolute Error)
    • 차이의 절대값을 평균낸 값
    • MAE=1nΣ∣y^−y∣(y^=PredictedValue)MAE = {1 \over n}\Sigma|\hat{y} - y| (\hat{y} = Predicted Value)

MSEMSE 그래프의 모양을 나타내면 다음과 같다.

오차가 가장 작은 지점의 기울기는 0, 따라서 미분값이 0인 지점의 W, b 의 값을 구하면 된다.

구하는 과정은 다음과 같다.

w 값을 구하는 과정

y^=wx+b,∂∂wMSE=1nΣ(wx+b−y)2=1nΣ2(wx+b−y)w=2nΣ(y^−y)w\hat{y} = wx + b, {\partial \over \partial w}MSE = {1 \over n}\Sigma(wx + b - y)^2 = {1 \over n}\Sigma2(wx + b - y)w = {2 \over n}\Sigma(\hat{y} - y)w
2×((y^−y)∗w).mean()2 \times ((\hat{y} - y)*w).mean()

같은 방법으로 b의 값을 구하면,

∂∂bMSE=2nΣ(y^−y){\partial \over \partial b}MSE = {2 \over n}\Sigma(\hat{y} - y)
2×(y^−y).mean()2 \times (\hat{y}-y).mean()
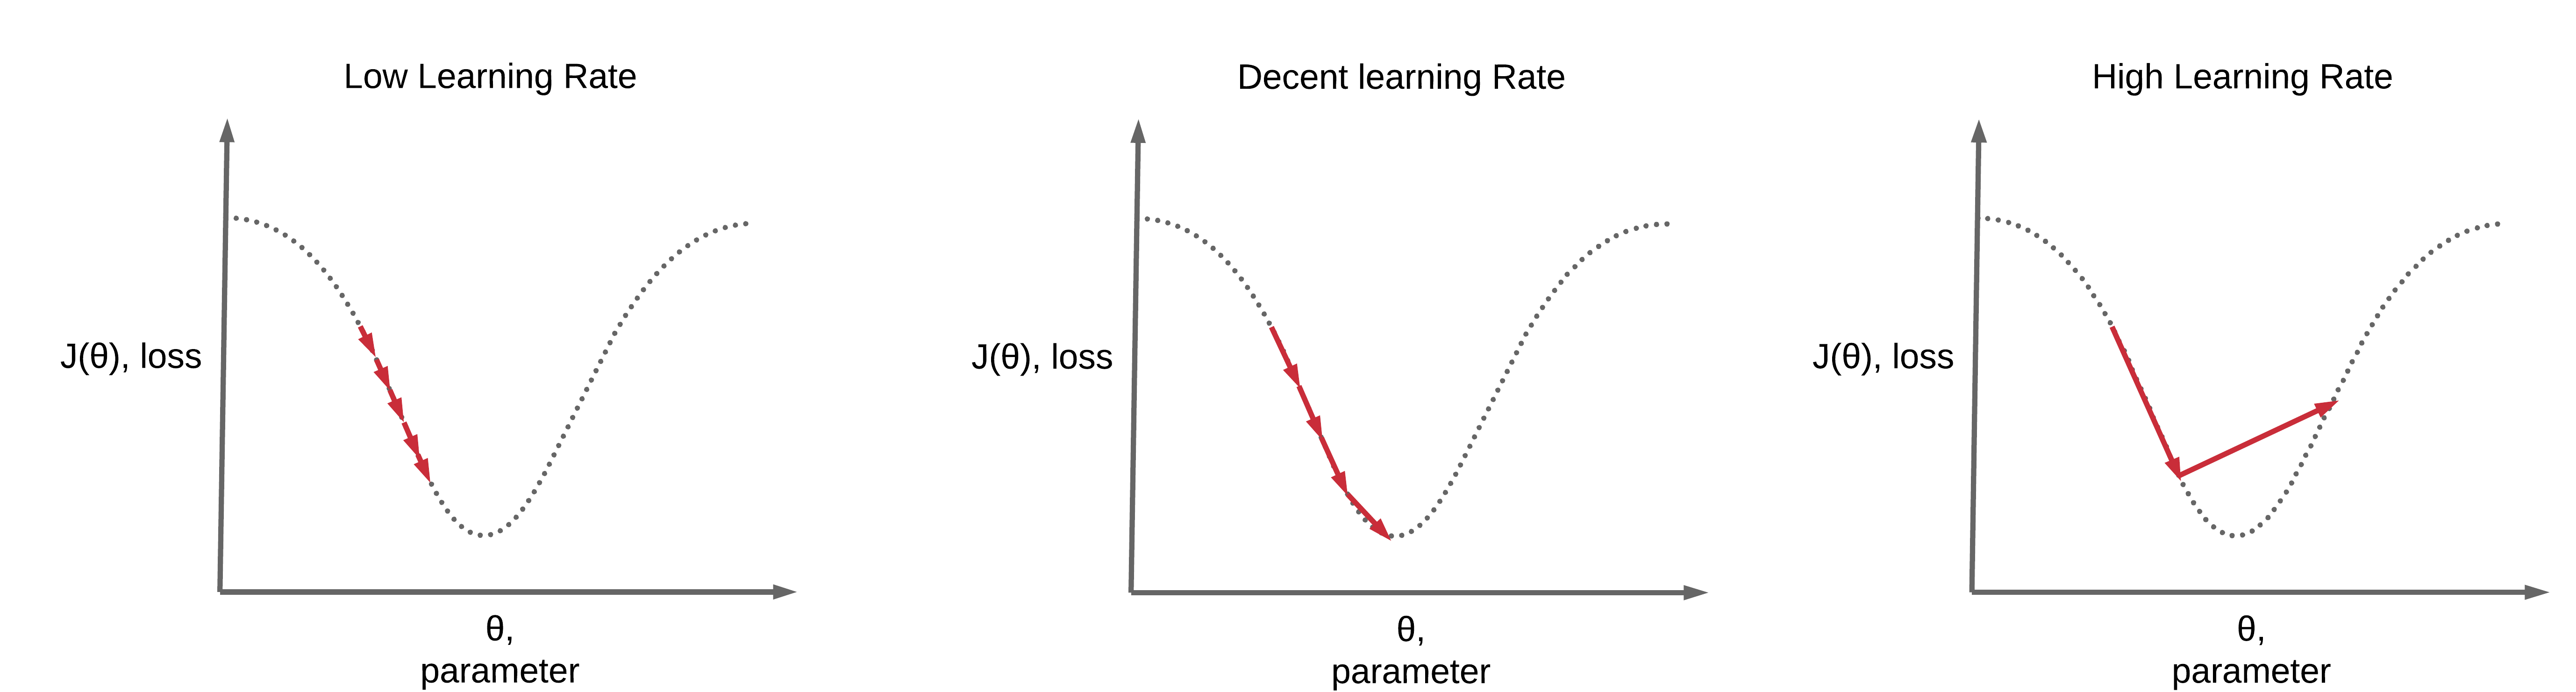
학습률(Learning Rate)

  • Learning Rate 가 너무 크면, 발산할 위험이 있고, 너무 작으면 제대로 학습되지 않을 수 있음.
  • 적절한 조율 필요
  • 단순 선형 회귀 경사하강법 code
    import numpy as np
    import matplotlib.pyplot as plt
    
    x_train = np.random.rand(100)
    y_train = 1000 * x_train + 500
    
    def plot_prediction(pred):
        plt.figure(figsize=(10, 10))
        plt.scatter(x_train, y_train)
        plt.scatter(x_train, pred)
        plt.draw()
        plt.pause(0.5)
        plt.close()
        
    
    w = np.random.uniform(-1, 1) # 초기값 설정(기울기)
    b = np.random.uniform(-1, 1) # 초기값 설정(y절편)
    
    learning_rate = 0.7
    
    for epoch in range(1000):
        y_pred = w * x_train + b
    
        error = np.abs(y_pred - y_train).mean()
        if error < 0.001:
            break
    
        w_grad = learning_rate * ((y_pred - y_train)*x_train).mean()
        b_grad = learning_rate * (y_pred - y_train).mean()
    
        w -= w_grad
        b -= b_grad
    
        if epoch % 10 == 0:
            print("[" + str(w) + "] [" + str(b) + "] [" + str(error) + "]")
            y_pred = w * x_train + b
            plot_prediction(y_pred)
    
    print("[" + str(w) + "] [" + str(b) + "] [" + str(error) + "]")
    
    #참고자료: https://s.sheenji.com/VCg2gL


  • 다중 선형 회귀 경사하강법 code
    import numpy as np
    import matplotlib.pyplot as plt
    
    x1_train = np.random.rand(100)
    x2_train = np.random.rand(100)
    y_train = 1000 * x1_train + 100 * x2_train + 500
        
    
    w1 = np.random.uniform(-1, 1) # 초기값 설정(기울기 1)
    w2 = np.random.uniform(-1, 1) # 초기값 설정(기울기 2)
    b = np.random.uniform(-1, 1) # 초기값 설정(y절편)
    
    learning_rate = 0.7
    
    for epoch in range(1000):
        y_pred = w1 * x1_train + w2 * x2_train + b
    
        error = np.abs(y_pred - y_train).mean()
        if error < 0.001:
            break
    
        w1_grad = learning_rate * ((y_pred - y_train)*x1_train).mean()
        w2_grad = learning_rate * ((y_pred - y_train)*x2_train).mean()
        b_grad = learning_rate * (y_pred - y_train).mean()
    
        w1 -= w1_grad
        w2 -= w2_grad
        b -= b_grad
    
        if epoch % 10 == 0:
            print("[" + str(w1) + "] [" + str(w2) + "] [" + str(b) + "] [" + str(error) + "]")
    
    print("[" + str(w1) + "] [" + str(w2) + "] [" + str(b) + "] [" + str(error) + "]")
    
    #참고자료: https://s.sheenji.com/VCg2gL


반응형

아래 두 과정을 모두 한 후, 이 글에 따라 진행하자

2019/08/06 - [프로그램 설치방법/vscode] - visual studio code 설치


visual studio code 설치

https://code.visualstudio.com/ Visual Studio Code - Code Editing. Redefined Visual Studio Code is a code editor redefined and optimized for building and debugging modern web and cloud applications...

sheenji.tistory.com

2019/08/06 - [프로그램 설치방법/vscode] - c/c++ 설치하기 (mingw-w64)


c/c++ 설치하기 (mingw-w64)

MinGW-w64 - for 32 and 64 bit Windows Download MinGW-w64 - for 32 and 64 bit Windows for free. A complete runtime environment for gcc. The mingw-w64 project is a complete runtime environment for gcc..

sheenji.tistory.com


  • c/c++ 검색 후 설치

  • mingw-w64 컴파일러 설정
  • ctrl + k, o를 눌러 파일 열기를 한다
  • 혹은 파일 → 폴더 열기를 눌러 vscode에서 작업할 폴더를 생성한다.

  • mingw-w64 컴파일러 설정
  • ctrl + k, o 를 눌러 파일 열기를 한다
  • 혹은 파일 → 폴더 열기를 눌러 vscode에서 작업할 폴더를 생성한다.

  • Ctrl + Shift + p 를 눌러 찾기 모드를 연다.
  • C/C++:Edit Configurations(JSON) 선택

  • c_cpp_properties.json 생성됨

  • compilerPath를 앞 글에서 컴파일러를 깐 위치로 변경해 준다.

  • 빌드 및 디버깅
  • Ctrl + Shift + p 를 통해 Tasks: Configure task를 선택한다.

  • Create Tasks.json file 옵션을 선택한다.

  • others를 선택한다.

  • tasks.json 파일이 생성된다.

  • 다음과 같이 정의한다.
{ // 한 파일에서 컴파일, 여기에선 a.exe로 진행한다.
    "version": "2.0.0",
    "tasks": [
        {
            "label": "compile",
            "type": "shell",
            "command": "g++",
            "args": [
                "-g",
                "${file}"
            ],
            "group": {
                "kind": "build",
                "isDefault": true
            }
        }
    ],
    
}
{ // 한 파일당, 같은 이름으로 만들어서 컴파일, ex) a.cpp 실행 -> 같은 폴더에서 a.exe 만들어짐
    "version": "2.0.0",
    "tasks": [
        {
            "label": "compile",
            "type": "shell",
            "command": "g++",
            "args": [
                "-g",
                "${file}",
                "-o",
                "${fileDirname}\\${fileBasenameNoExtension}.exe"
            ],
            "group": {
                "kind": "build",
                "isDefault": true
            }
        }
    ],
    
}
  • 디버깅
  • 먼저 디버깅을 설정하기 전에 helloworld.cpp 파일을 만들어 준다.

  • 디버깅 단축키인 F5 버튼을 누르면 다음과 같이 나온다.

  • 디버깅 단축키인 F5 버튼을 누르면 다음과 같이 나온다.

  • 생성된 launch.json 파일을 다음과 같이 수정해 준다.
  •  
{
    // IntelliSense를 사용하여 가능한 특성에 대해 알아보세요.
    // 기존 특성에 대한 설명을 보려면 가리킵니다.
    // 자세한 내용을 보려면 https://go.microsoft.com/fwlink/?linkid=830387을(를) 방문하세요.
    "version": "0.2.0",
    "configurations": [
        
        
        {
            "name": "(gdb) Launch",
            "type": "cppdbg",
            "request": "launch",
            "program": "${workspaceFolder}/a.exe", // 위에서 첫번째 과정 사용시 이 부분 사용
            // "program": "${fileDirname}\\${fileBasenameNoExtension}.exe", // 위에서 두번째 과정 사용시 이 부분 사용
            "args": [],
            "stopAtEntry": false,
            "cwd": "${workspaceFolder}",
            "environment": [],
            "externalConsole": false,
            "MIMode": "gdb",
            "miDebuggerPath": "C:/mingw-w64/x86_64-8.1.0-win32-seh-rt_v6-rev0/mingw64/bin/gdb.exe",
            "setupCommands": [
                {
                    "description": "Enable pretty-printing for gdb",
                    "text": "-enable-pretty-printing",
                    "ignoreFailures": true
                }
            ],
            "preLaunchTask": "compile"
        }
    ]
}
반응형

'프로그램 설치방법 > vscode' 카테고리의 다른 글

c/c++ 설치하기 (mingw-w64)  (0) 2019.08.06
visual studio code 설치  (0) 2019.08.06

https://s.sheenji.com/AYOo9A


MinGW-w64 - for 32 and 64 bit Windows Files

A complete runtime environment for gcc

https://s.sheenji.com/AYOo9A

2020.10.19 update) 위 사진 대신, 아래의 방법으로 다운로드

아래로 스크롤 하면 나옴

  • 나중 설정을 위해 program files 아래가 아닌 c밑에 바로 설치해준다.

  • 나중 설정을 위해 program files 아래가 아닌 c밑에 바로 설치해준다.

  • 나중 설정을 위해 program files 아래가 아닌 c밑에 바로 설치해준다.

  • 변수 설정 확인하기

  • gcc --version으로 환경 변수 등록 확인

반응형

'프로그램 설치방법 > vscode' 카테고리의 다른 글

c/c++ 설치(vscode)  (0) 2020.10.30
visual studio code 설치  (0) 2019.08.06
반응형

'프로그램 설치방법 > vscode' 카테고리의 다른 글

c/c++ 설치(vscode)  (0) 2020.10.30
c/c++ 설치하기 (mingw-w64)  (0) 2019.08.06

+ Recent posts